Sunday, May 23, 2010

How to recover deleted file in Eclipse ?


Suppose you have deleted any file by mistake. That file was not checked in in the SVN/CVS and your manager/team lead calling you for status........ what the hell is........ but if you used Eclipse then no need to worry.This tutorial explain you how to do that.....
You can recover deleted file in eclipse means deleted files can be restored from the local history of Eclipse.
Following are the screen shots that show how to recover deleted files in eclipse.

1) Let this is your folder structure of Eclipse Project.


2) Let you have deleted ThreadDemo.java File from Eclipse IDE by mistake.


3) You clicked on the OK button, Now you realized that it was not useless file. You need it. now what to do........


4) Finally you have deleted file..... don't worry, eclipse is with you........ It store all files in its temp folder for some time. We can recover from Eclipse. Now start operation.........
    right clicks on the Eclipse project and select "Restore From local history"


5) You'll get list of all deleted files in eclipse ........., Select the files that you like to Restore and clicks on the "Restore" button.


6) Thanks god it is eclipse...... :)


Saturday, May 8, 2010

How to find Cut and Paste Code in Eclipse Using PMD ?

PMD is is great tool for finding code violation and many other defects before product release( If you have not installed then follow this link How to install PMD in Eclipse ? ). One of that feature is find the repeated cut and paste code. Cut/copy/paste is very bad programming practice. Repeated (Cut&Paste) code generally indicates poor planning or team coordination. Therefore we should be refactor our code to remove that bad practice.Refactoring classes with repeating code should be given a high priority. PMD is very effective to find out such classes by scanning the code in a way similar to PMD violation checks. The number of lines of similarity (the metrics used by PMD to match code patterns) is 25 by default and can be set in PMD's Preferences page.
  1. Start Eclipse
  2. First Go to the package explorer and Right Click on your project and select PMD | Find Suspect Cut And Paste


  3. PMD creates a folder reports under your project and stores the result text file


  4. Select Window | Show View | Navigator
  5. In Navigator view click on Your Project and then on the reports folder
  6. The report file cpd-report.txt should look like this:
    Found a 5 line (15 tokens) duplication in the following files:
    Starting at line 21 of G:\besthowtodo\workspace\HelloDynaWeb\src\com\besthowtodo\tutorials\dynaweb\DemoPMDThread.java
    Starting at line 25 of G:\besthowtodo\workspace\HelloDynaWeb\src\com\besthowtodo\tutorials\dynaweb\DemoPMDThread.java
          public void WRITE_SOMETHING_WITH_COPY_PASTE(String INPUT_PARAMETER) {
                 System.out.println(INPUT_PARAMETER);
          }
          public static void main(String[] args) {


How to Generating PMD Reports InEclipse ?

You have configured and found the all violation but I think you also like to save all that data for future reference. You can do this without using any other tool. For situations of this kind PMD provides a handy reporting tool it is able to generate reports in multiple formats. Currently PMD can generate reports in HTML, XML, plain text as well as Comma Separated Value (CSV) formats.
  1. Right Click on the java project in the project explorer and select PMD | Generate reports
  2. It creates a report folder in your application and create violation report.
  3. Select Window | Show View | Navigator
  4. In Navigator view click on Project and then on the reports folder
  5. That folder content same report in different format one of them html format. It is something like:

Wednesday, May 5, 2010

How to use PMD in Eclipse ?

Before launching Eclipse make sure you have enough memory for PMD.(If not know how to install PMD Eclipse plugin then follow this link How to install PMD in Eclipse ? ) This is particularly important when analyzing large projects. In these situations PMD tends to be memory-hungry. Hence, make sure to start with as much memory as you can afford, for example 512M (eclipse.exe -vmargs -Xmx512M)
    1. Launch Eclipse
    2. Let you have previously created a Java Project PMDDemo, Otherwise you need to create a new project in your workspace File | New | Project...
    3. In the Package Explorer right-click on PMDDemo project and select New | Class
    4. In the following dialog enter the class name as DemoPMD and click Finish
    5. A new class DemoPMD is created in project's default package. Paste the following code into the new class:

      public class DemoOMD {
       
        private static final String bAD = "BAD";
        
          public void BadMethodName() {
                  System.out.println("Hello PMD World!");
           }
        
           public String thisIsCutAndPaste(String first, int second) {
                  System.out.println("New world");
                  return "New world";
           }
        }
    6. Similarly, create a second class DemoPMDThread and paste the following code:

    public class DemoPMDThread extends Thread {

       public DemoPMDThread(String str) {
             super(str);
      }

     public void run() {
             for (int i = 0; i < 100; i++) {
                     System.out.println(i + " " + getName());
                     try {
                             sleep((long) (Math.random() * 1000));
                     } catch (InterruptedException e) {

                     }
             }
             System.out.println("DONE! " + getName());
      }

      public void WRITE_SOMETHING(String INPUT_PARAMETER) {
             System.out.println(INPUT_PARAMETER);
      }

      public static void main(String[] args) {
             new Yang("Good").start();
             new Yang("Bad").start();
      }

      public String thisIsCutAndPaste(String pFirst, int pSecond) {
             System.out.println("New world");
             return "New world";
      }
    }


    7. In the Package Explorer right-click on QA Project and select PMD | Check Code With PMD
       
      Wait for PMD to scan DemoPMD and DemoPMDThread
      If PMD Violations view is not open navigate to Window | Show View | Other... and select PMD | PMD Violations, you'll get following view...


      In the PMD Violations view notice a list of 27 violations. In large projects this list could easily grow up to several thousand. This is one of the reasons PMD allows violations be filtered by priority. Priority is a configurable attribute of a PMD rule. PMD assigns priorities from 1 to 5 and each priority is represented by a colored square at the top-right corner of the view. These little squares are actually clickable on-off switches used to control the visibility of the violations they represent.
      The results table itself is well laid out and most columns are sortable. It is also possible to get more detail on a violation by simply right-clicking it and selecting Show Details. PMD pops-up a dialog with information such as rule name, implementation class, message, description and an example. This feature can be helpful when trying to makes sense of a new rule or letting inhouse developers know about a particular company rule or coding convention.


        Finally, in the PMD Violations table it is possible to add review annotations to the source where the violation occurred. This can be an effective way to mark target files for further review. Just right-click on any violation in the list and select Mark review. PMD will insert a review annotation to the Java source right above the violation line itself. The review annotation should look like this:

        // @PMD:REVIEWED:MethodNamingConventions: by Sanjay Singh on 5/08/10 5:04 PM

        Review annotations can be removed anytime by right-clicking QA Project and selecting PMD | Clear violations reviews. Similarly, PMD Violations can be cleaned-up by right-clicking QA Project and selecting PMD | Clear PMD Violations..

        How to install PMD in Eclipse ?

        The easiest way to install PMD is by using the remote update site.
        Users behind firewalls should check proxy settings before going any further.
        If these settings are misconfigured the updater will not work. PMD also
        supplies a zip file for manual installation. Download the file and follow
        the readme. Demonstrated below is installing PMD via the Eclipse Software Updater.

        1. Launch Eclipse.
        2. Navigate to Help | Software Updates | Find and Install...
        3. Select "Search for new features to install" and click Next
        4. Click New Remote Site...
        5. Enter a name (PMD) and the URL http://pmd.sourceforge.net/eclipse

        http://www.eclipsezone.com/articles/pmd/images/remote_site.png

        1. In Sites to include in search check PMD and click Finish
        2. In the Search Results dialog check PMD for Eclipse 3 3.1.0 and click Next

        http://www.eclipsezone.com/articles/pmd/images/install_pmd_remote.png

        1. Accept the terms of the license agreements and click Next
        2. Click Finish.
        3. Wait for Eclipse to download the required jar files, then click Install
        4. Restart the workbench. This will load the PMD plugin.
        5. Navigate to Window | Show View | Other...
        6. Select PMD | PMD Violations
        7. PMD Violations view should appear at the bottom pane


        Sunday, May 2, 2010

        How do I make my web application be the Tomcat default application ?

        You have created and tested a first web application (traditionally called "besthowtodo"), users can access it via the URL "http://besthowtodo.company.com/besthowtodo". You are very proud and satisfied. But now, how do you change the setup, so that "besthowtodobesthowtodo" gets called when the user enters the URL "http://besthowtodo.company.com" ?
        The pages and code of your "besthowtodo" application currently reside in (CATALINA_BASE)/webapps/besthowtodo/. In a standard Tomcat installation, you will notice that under the same directory (CATALINA_BASE)/webapps/, there is a directory called ROOT (the capitals are important, even under Windows). That is the residence of the current Tomcat default application, the one that is called right now when a user calls up "http://besthowtodo.company.com[:portNumber]". The trick is to put your application in it's place.
        First stop Tomcat.
        Then before you replace the current default application, it may be a good idea to make a copy of it somewhere else.
        Then delete everything under the ROOT directory, and move everything that was previously under the (CATALINA_BASE)/webapps/besthowtodo/ directory, toward this (CATALINA_BASE)/webapps/ROOT directory. In other words, what was previously .../besthowtodo/WEB-INF should now be .../ROOT/WEB-INF (and not .../ROOT/besthowtodo/WEB-INF).
        Just by doing this, you have already made you webapp into the Tomcat default webapp.
        One step is left : you also need to have, within your application, a default servlet. This, you do by means of an appropriate url-mapping in the WEB-INF/web.xml configuration file of your application. Make sure you have something like this in that file :
        <servlet>
        <servlet-name>Best HowToDO Servlet</servlet-name>
        <servlet-class>com.besthowtodo.tutorials.Servlet.Number1</servlet-class>
        </servlet>
        
        <servlet-mapping>
        <servlet-name>Best HowToDO Servlet</servlet-name>
        <url-pattern>/*</url-pattern>
        </servlet-mapping>

        Restart Tomcat and you're done.
        Call up "http://besthowtodo.company.com/" and enjoy.
        Addendum 1 : If you are deploying your application as a war file..
        The above instructions relate to the situation where you are "manually" deploying your application as a directory-and-files structure under the /webapps directory. If instead you are using the "war" method to deploy your application, the principle is about the same :
        - delete the ROOT directory
        - name your war file "ROOT.war" (capitals mandatory)
        - drop the ROOT.war file directly in the /webapps directory.
        Tomcat will automatically deploy it.

        how do I set memory related settings to improve Tomcat performance?

        When our web application is using large memory as this memory size default setting can be too small, 64MB by default,thus the application becomes slower because the garbage collector is invoked more often, and it can even run out of memory (outofmemory / heap space error ). One way to address this problem is to set a larger heap size . In Windows system, this can be done by editing / adding JAVA_OPTS variable (should be early in the file) in CATALINA_HOME/bin/catalina.bat or catalina.sh for Linux/Unix systems.Parameters to be added are , let say you want to increase it to 256 MB (as you required but make sure you have enough amount of physical memory/RAM and for 32bit system , use no more than 1-1.1 GB heap space size ) , use '-Xms256m -Xmx256m' .In some cases , it is better to set slightly lower size for -Xms . There are other parameters can be added , some of them :'-XX:MaxNewSize -XX:NewSize -XX:MaxPermSize' , depending on your application and requirements .

        For catalina.bat there now should be a line in the file that looks like this:  set JAVA_OPTS=-Xms256m -Xmx256m 

        For catalina.sh:  JAVA_OPTS='-Xms256m -Xmx256m' 

        For other parameters , Try this Apache Link:
        http://wiki.apache.org/tomcat/FAQ/Memory
        http://wiki.apache.org/tomcat/OutOfMemory

        How do I share sessions across web apps?

        You cannot share sessions directly across web apps, as that would be a violation of the Servlet Specification. There are workarounds, including using a singleton class loaded from the common classloader repository to hold shared information, or putting some of this shared information in a database or another data store


        How to set the SDK JRE as the default JRE for Eclipse ?

        First start the Eclipse. You will have to configure several options from the workbench preferences pages. Now open the preferences dialog by selecting Window > Preferences, as shown in Figure 1.

        Figure 1. Eclipse preferences
        Eclipse preferences
        Select the Java option from the left-hand tree view. Expand the Java element and select Installed JRE's, as shown in Figure 2.

        Figure 2. JRE preference settings
        JRE preference settings
        Click Add and navigate to the JRE directory of the SDK you installed during the installation phase of the configuration above, as shown in Figure 3. Click OK.

        Figure 3. Adding a JRE to the Eclipse preference settings
        Adding a JRE to the eclipse preference  settings
        Check the check box beside the JRE you just added from the SDK you installed, as shown in Figure 4. This sets this JRE as the default JRE to be used by Eclipse.


        Figure 4. Setting the default JRE for Eclipse
        Setting the default JRE for Eclipse and  Tomcat


        Just Select OK, now we have configured JDK with Eclipse default JRE

        How to add meta keyword and description in blogspot ?

        Keywords are very important for search engine result. If you have created your blog and like to add your own keyword in your blogger.
        To do this use following steps

        Step 1: Login to the Blogger site

        Step 2: Go to the Layout tab

        Step 3: Then clicks on the Edit HTML tab

        Step 4: Now Search for the following lines
                   <b:include data='blog' name='all-head-content'/>

        Step 5: Now Add the following META TAG information just below the above tag

         <meta content='THIS IS THE DESCRIPTION OF YOUR BLOG' name='description'/>
         <meta content='LIST OF KEYWORD FOR YOUR BLOG' name='keywords'/>
         <meta content='AUTHOR' name='author'/>
        Step 6: Save the layout, You can now check your blogs HTML source code to verify it

        How to create dynamic web project in Eclipse ?


        I considered that you have already installed Eclipse and tomcat and able to configure both so now like to make a dynamic web based application. To do that follow this steps:

        1. First select the File menu and then "Dynamic Web Project". If there is no "Dynamic Web Project" then choose "Others..." option


        2) If you selected "Other..." then you'll get following screen. Find the "web" folder and then expend it and select "Dynamic Web Project" and click on the "Next" button.
        3) Then Write the project name and select runtime server(If you don't know how to configure tomcat with Eclipse, then follow this article "How to configure Tomcat with Eclipse ?"). I have selected tomcat.


        4) After above steps you'll get following screen. Context root is your default application name, Content directory is the location in which you need to place all your JSP, Java script files....... and last one is src folder. It is the name of source folder. You can rename it with any other words but for now I am going to use default one.


        5) After click on Next button you'll get a new entry for project in the "Project Explorer".


        6) Below is the folder structure of a new web application. Eclipse creates all required folder structure for your project.


        How to configure Tomcat with Eclipse ?


        Required Software :
        Eclipse 3.4
        Tomcat 6.0.x

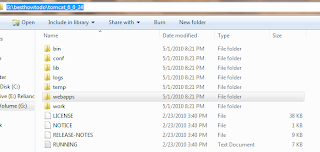
        Step1: First download the tomcat and install it any location of your hard drive.


        Step2: Run the eclipse (If already not installed go the link "how to install Eclipse"). Clicks on the window menu and then Preferences menu item

        Then you'll get...

        Step 3: Now expend the server item and select Runtime environment and after that click on the add button.

        After clicking on the add button you'll get following screen......

        Step 4: Now select Apache as a server type and expend and select tomcat 6.0(choose according to the tomcat version you are using ). I am using tomcat 6.0.x so I selected tomcat 6.0 and then clicks on the next button.

        After that you'll get following screen.......

        Step 5:Clicks on the browse button

        Step 6: Now find the location of tomcat on your local drive and select tomcat folder and clicks on the OK button


        Step 7: Now the final view something like this, and clicks on the Finish button.
        After that you'll get following screen
        Step 8: After above step, you have configured tomcat with Eclipse and can use it with eclipse. Now clicks on the OK button
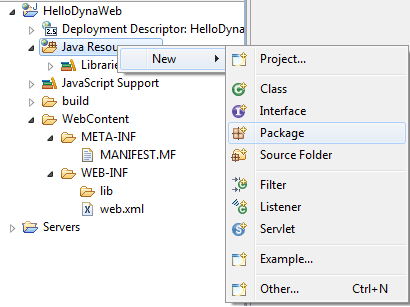
        Step 9: Now we need to view our tomcat server in eclipse so first click on the window menu and select Show View and then other view.

        After that you'll get following screen.......

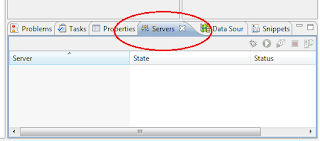
        Step 10: Now select Server item and then select server

        After that you are able to user server view as shown in the following figure
        Step 11:Now we are able to view our server view but we need to create a server instance that can be used to run our web based application.


        Step 12: Now right click on the server view as shown in the following figure. Again select new and thne Server and click
        After that you'll get following screen.
        Step 13:Again select Apache and then tomcat 6.0 and clicks on the next button
        After that you'll get following screen

         Step 14: Following screen'll show you all application that are present in the tomcat workspace and ready to run on tomcat server. Right panel content all application that are ready to run on tomcat server.
        And click on the finish button.
        After that in the server view you get tomcat server is ready to run.

        Step 15: There are 2 main buttons that are used to run tomcat according to developer needs. If you want to run tomcat in debug mode then select left button otherwise use right button.


        Step 16:Let you have clicked on the right button then you'll see following status(started) and if you like to see the server log then click on the console view.

        Step 17:If there is no error message in the console view and get some server startup time that means you have perfectly configure tomcat with Eclipse and able to use it.

        How to install Eclipse ?

        Required Software :
        1) Java 1.5+
        2) Eclipse

        Prearrangement : Considered that you have already installed Java 1.5+

        Step 1: Go to the http://www.eclipse.org  and click on the download link.
        Step 2: You'll get Download page according to the your requirement, select Eclipse down loadable file. Now I am going to download Eclipse J2EE version.

        Step 3: Click on the download Button


        Step 4: Save file in your local drive.

        Step 5: You can save and unzip it at any location of your local disc. Let you have saved it in "G:\besthowtodo". Then Eclipse location will be "G:\besthowtodo\eclipse". You need to also create a new folder for workspace that content all created projects.


        Step 6:Now double click on the eclipse.exe file and then you'll get ...

        Step 7:  Now browse the your workspace and click on the OK button

        Step 8:  After that you'll get WelCome page of Eclipse
        Step 9: Now Eclipse is ready for you .......... :)